Twitter Text Analytics in Node.js, Part 2
In this tutorial, we take our first look at sentiment analysis on twitter data to track public opinion about your brand, product or service. This is part 2 in a series of tutorials about gauging public interest and opinion about some topic. Part 1 describes how to get connected to the Twitter data feed and create a nice dashboard to track interest in terms of the number of tweets. Part 3 will discuss some basic techniques for discovering what people are saying in tweets about your topic.
In this tutorial, we’ll extended the functionality of the server set up in part 1, so you’ll want to go through that one first. There is not a lot of coding because the hard work is provided by the LX NLP Server we are using, so I’ll make use of the extra space to give some background on sentiment analysis.
Sentiment Analysis
Let’s start with a brief longer than expected introduction to
the concept of sentiment analysis. The goal of sentiment analysis is
to analyze a text passage and determine whether the passage expresses
an overall positive or negative attitude. For example, “What an
amazing performer!” is an obviously positive statement whereas “I
found their website really slow and hard to navigate” is clearly
negative. In some cases, it may also determine the passage to be
neutral if it does not express any sentiment. Sentiment analysis is a
difficult task, even for humans. For example, think about how
difficult it sometimes is to tell if one is being sarcastic or not.
When a statement is sarcastic, the actual sentiment is the opposite of
the one expressed.
There are two main approaches to automatic sentiment analysis: machine learned and lexicon based. The machine learning approach uses algorithms designed to learn how to classify inputs by example. The algorithms are given a large number of example passages along with the expected correct sentiment output and the algorithm “learns” a model that can be applied to new texts to automatically predict the sentiment.
The lexicon approach is based on a dictionary of words, each with an associated positive or negative sentiment strength. For example, good, awesome or nice would have high positive values and ugly, boring and slow would have high negative values. The overall sentiment of a passage is then some combination of the individual sentiments of the words in it. This approach also makes use of a number of rules of language that modify the individual word sentiments. For example, there are strengtheners like very that increase the magnitude of the sentiment, negators that reverse the sentiment, etc. The best machine learned models tend to be more accurate than the lexicon-based algorithms. However, machine learning models tend to be more specific to the context used to train them and may perform badly when applied in other contexts, whereas the lexicon-based approaches tend to continue to perform reasonably in a broad range of situations. For this reason, the LX NLP Server that we are using in this tutorial employs the lexicon-based approach.
When using sentiment analysis, bias is an important concept to understand. Bias means that the algorithm may produce results that lean more towards the positive or negative side. The bias depends not only on the algorithm but also the context in which it’s used. Consequently, sentiment analysis results should always be considered a relative number. For example, if you run sentiment analysis on a set of tweets and it reports 55% are positive, don’t despair that nearly half the tweets about you are negative. Instead, 55% is just a baseline that you use to compare to another. For example, how does it compare month over month, how does it change during a marketing campaign or how does it compare between two different announcements.
To summarize:
- Sentiment analysis predicts whether a text passage expresses a positive or negative attitude.
- Sentiment analysis can be a difficult task.
- The lexicon-based approach generalizes well across different domains.
- The percentage of positive texts in a collection can be used as a metric of public sentiment.
- The percentage metric is relative, and should only be used in comparisons.
Extending the Twitter client
The goal of this tutorial is to extend the Twitter client presented in part 1 to track the sentiment of incoming tweets using the LX NLP Server API. The server has a very simple HTTP API for classifying a text passage’s sentiment.
Add the following function to the client.js file created in part 1 to make the API call:
var http = require('http');

// A function to send a tweet to the NLP server and get a sentiment score

function getSentiment(data) {
    var options = {
        hostname: 'localhost',
        port: 9000,
        path: '/nlp/sentiment?social=1',
        method: 'POST',
        headers: {
            'Content-Type': 'text/plain',
	    'Content-Length': Buffer.byteLength(data, 'utf8')
	}
    };


    var req = http.request(options, function(res) {
        res.setEncoding('utf8');
        var body = '';
        res.on('data', function (chunk) {
            body += chunk;
        });
        res.on('end', function () {
            // The NLP server returns -1, 0, or 1 sentiment score
            // Store the counts for each category in graphite
            res = parseInt(body);
            if (res > 0)
                stats.increment('sentiment.positive.count', 1);
            else if (res < 0)
                stats.increment('sentiment.negative.count', 1);
            else
                stats.increment('sentiment.neutral.count', 1);
        });
    });

    req.on('error', function(e) {
        errorLog.error('NLP Server error: ' + e);
    });

    req.write(data);
    req.end();
}
There are three sections to this function:
- Setup options The NLP API is served on port 9000 of the server.
The sentiment analysis request URL for short text is
/nlp/sentiment?social=1. The request is a POST request because the text to be analyzed is sent as the body of the request. The content body is text and the length of the text is required in the content-length HTTP header. - Callback handler The callback function of the HTTP request
collects the response from the server in
bodyand then sends metric data to Graphite/Grafana when complete. The sentiment analysis call returns a single integer that is >0 for positive sentiment, <0 for negative and 0 for neutral. The function uses thestatsmodule to increment counters for each class so we can display the totals by day/week/month in Grafana. - Send the request with the text The
writemethod sends the post body and theendmethod completes the request.
See the full documentation of the HTTP API for more detail.
To complete the code, add a call to getSentiment in the tweet
callback function so it looks something like the following:
stream.on('tweet', function (tweet) {
    if (tweet.text) {
        if (tweet.text.search(/[hH][tT][tT][pP][sS]?:\/\//) < 0) {
            stats.increment('twitter.tweet.count',1);
            getSentiment(tweet.text);
        } else {
            stats.increment('twitter.spam.count',1);
        }
        tweetLog.info(tweet.text);
    }
});
Start up the client as before:
/opt/node32/bin/node client.js
That’s it! Try adding a single graph in Grafana with all three metrics: sentiment.positive.count, sentiment.negative.count and sentiment.neutral.count. If you need help adding the graph, refer to the final section of the tutorial part 1. The counters will not be available in Grafana until some data comes in, so you may need to wait a few minutes.
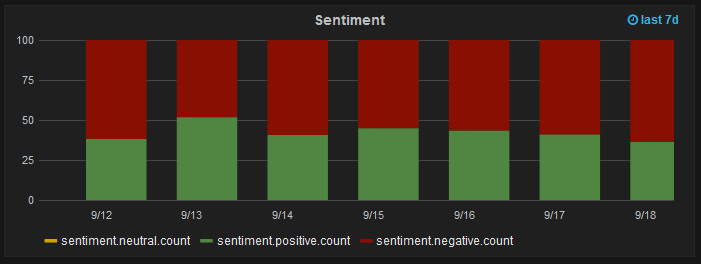
I configure mine as a bar graph with the stack and percent options and stacked values set to individual on the display styles tab. Click the color line in the legend to change positive to green and negative to red. That will give you something like the following.
Closing
That concludes part 2 of the tutorial. The full source code from this tutorial is also available from the GitHub blog repository.
Please leave your comments and suggestions below. Also, don’t miss the rest of the series - use the contact links at the very bottom of this site to follow me on Twitter or LinkedIn!
Subscribe via RSS